CSS Selectors & Class Declarations

Let's resume our learning:
Recap
CSS Syntax:
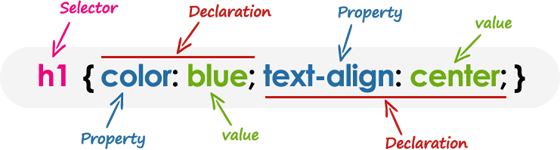
HTML has tags & CSS has selectors. Selectors are the names given to styles in internal and external style sheets.
There are specific types of selectors in CSS, let's take a closer look at them:
- Universal Selector: It selects all the HTML elements of the web page. It is represented using *.
Ex: * {
color: blue;
}
This will change the text colour to blue for all the html elements on the page.
- Class Selector: It selects the HTML elements that contains the class name followed by period character. It is represented using period character(.)
Syntax: .class_name { property: value }
Ex: <h1 class="check1"> My colour is changed.</h1>
CSS: .check1{
color: green;}
In above example, the colour of the text changes as it access the class name & change the properties.
- ID Selector: It is used to select the specific element using the id attribute of HTML element. It is represented using #.
Important: ID name can't start with a number.
Syntax:#id_name { property: value }
Ex: <h1 id="unique"> My colour is changed.</h1>
CSS: #unique{ color: pink;}
In above example, the colour of the H1 changes as it access the id name & change the properties.
- Type Selector: It is used to target specific HTML elements via its name & change the properties.
Ex: <h1> My colour is changed.</h1>
CSS: h1{ color: yellow;}
In above example, we are directly accessing the html tag H1 & changing its properties i.e. colour of the text changes to yellow here.
- Grouping Selector: It selects all the HTML elements having the same styling definitions at once. (Importance: Minimising code) We need to separate each selector with a comma.
Ex:
<body>
<a> I am link.</a>
<h6> I am heading 6.</h6>
<p> My colour is yellow. checking group selector working </p></body>
CSS: Instead of doing this:
a{ color: blue;}

h6{ color: blue;}

p{ color: blue;}
We do this:
h1,h6,p{ color: blue;}
In above example, we are directly accessing the html tags a, h6, p & changing their styling as they all have same definitions so we have grouped them using group selector.
- Pseudo-class & Pseudo-element selector: It is used to define special state of any particular element and pseudo-elements are used to specify particular parts of the elements.
Pseudo-class syntax:
selector:pseudo-class {
  property: value;
}
Pseudo-element syntax:
selector:pseudo-element {
  property: value;
}
Let's say if we want to change the style of an element here button when the user hovers over the button then all of that can be done using these pseudo-classes & elements.
button:hover {
  color: red;
}
Here the color of the button changes to red when the user's pointer hovers over it.
Checkout our previous blogs as well.
Happy Learning!!